Introduction
This tutorial describes how to enter a purchase order in Smartwerks.
On the P/O screen, you can update an item’s cost, which will display when you receive the purchase order. If an item is using fixed pricing, you can change the price on this screen and it will update in the system when you save the P/O.
IMPORTANT: Before a purchase order can be created, you must set up the vendor on the A/P Vendor Maintenance screen.
Step-by-Step
- From the top menu, select P/O > P/O Entry.
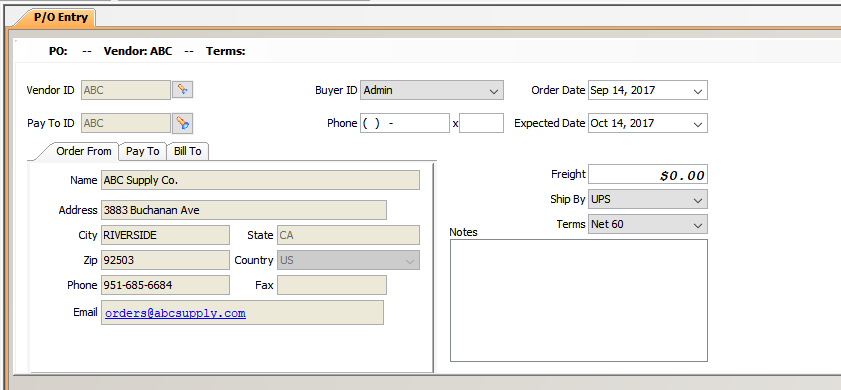
- Enter the Vendor ID of the supplier you are ordering from.
If you don’t know the Vendor ID, click the Search button (flashlight) to the right of the field. When the search window appears, enter as much information about the vendor as you know, and click Search. Matching vendors then display. Double-click the correct one to select it for the purchase order.
- You can view the Vendor’s information on the Order From tab.
- If you are paying a different vendor than you are ordering from, enter another Vendor ID in the Pay To ID field. For example, if you know you are paying for this P/O with your credit card, you can set up your credit card as a vendor, and enter that vendor in the Pay To ID field.
If you don’t know the Pay To Vendor ID, click the Search button (flashlight) to the right of the field. When the search window appears, enter as much information about the vendor as you know, and click Search. Matching vendors then display. Double-click the correct one to select it for the purchase order.
- You can view the Pay To Vendor’s information on the Pay To tab.
- The Branch ID field on the Bill To tab displays the branch you are currently logged into. If you want a different branch to be responsible for payment, select the correct Branch ID from the drop-down menu.
- The Buyer ID field displays the employee currently logged into Smartwerks. If necessary, choose a different employee from the drop-down menu.
- Select the Order Date. A previous or future date can be chosen.
- Select an Expected Date, which is the date you expect the merchandise to arrive.
- Enter a Freight amount (optional).
- Freight can also be added when the invoice number is entered in the AP Not Posted screen.
- The Terms field defaults to the terms set up for this vendor in AP Vendor Maintenance. If necessary, select different terms for this order from the drop-down menu.
- Choose a shipping vendor from the Ship By drop-down menu (optional).
- Add any notes about this order in the Notes field (optional).
- Click inside the Item # column and then scan or enter the first item for the order. The item description displays.
NOTE: If you don’t know the Item Number, double-click inside the field to look one up. When the search window appears, enter as much information about the item as you know, and click Search. Matching items then display. Double-click the correct one to select it for the purchase order.
- If the entered item does not exist, Smartwerks asks if you want to create it. Click Yes and the Inventory Maintenance screen opens in a new tab to create the item.
- In the Qty field, enter the quantity being ordered.
- The Manufacturer’s SKU field is required. If you have not entered the SKU# in Inventory Maintenance, you must enter it here.
- The cost from Inventory Maintenance displays in the Unit Cost field. If the current cost is different, enter it in the field. The average weighted cost for this item will update when the P/O is received.
- The Extended Cost (Qty x Unit Cost) calculates automatically.
- The prices set up in Inventory Maintenance display in the Price 1 field. If Price 2 and/or Price 3 levels are set up, they also display in the corresponding fields.NOTE:
- If the price is set to Fixed in Inventory Maintenance, you have the option to change it on this screen. When a change is made, the price in Inventory Maintenance is modified and all quantities of the item in the company are updated with the new price.
- If the price is calculated in Inventory Maintenance using another method (% of MSRP, %GM, % of Markup/Cost, etc.), the price cannot be modified here. The prices for these items are calculated by Smartwerks when the P/O is received.
- A single purchase order can be received by multiple locations. From the Ship Branch drop-down menu, select the branch the item should be shipped to. The branch you are logged into appears by default. Receipt of these items is completed at the individual branches.
- Repeat steps 12-18 until all items are added to the purchase order.
- Click the Delete Item button to remove items.
- To view a history of purchases made from the Order From vendor, click the P/O History button. A window opens and all purchase orders for that vendor display.
- Click Save in the toolbar to retain this P/O. If prices were changed on this purchase order, they are updated in Inventory Maintenance.
- If your email is integrated with Smartwerks, click the Email P/O button to send this P/O electronically.
- Print, close and reset options are also located in the toolbar. The Print button prints a copy of the P/O, the Close button closes the purchase order without saving it, and the Reset clears all information entered for this P/O and restarts the entry process from the beginning.


